Podcast in Blogger

Here is a very easy method to deliver your podcasts through Blogger feeds. There is no coding required. You will have to switch your blog feeds to full to take advantage of this method. Blogger does not allow you to edit your feeds but with Feedburner Smartcast you can overcome this difficulty............

A Podcast is a feed containing a audio/video/pdf file which you have published in your blog posts. The feed delivers these files to a client like iTunes which then starts downloading the file to your PC. You can then transfer them to your iPhone, iPod, PDAs, Cellphones so you can listen to them on the move.


The first step
is obviously to have your media file ready. You can create one using your PC's multimedia capabilities or even online at some sites over the telephone. After creating such a MP3/video file you have to upload it to a freehost and copy down it's link.


The second step is to create a new blog specifically for podcasting or use your present blog itself. After creating the blog go to Settings------>Site Feed and Enable feeds to Full. Also in Settings----->Formatting enable title Field and Link Field. Next you have to burn your blog feed at Feedburner and copy down the new feed url. Feedburner connects to your Blogger feeds and modifies them and sends them out with a new URL.
Blogger does not give Feed Statistics or allow any Feed modification which is the advantage of using Feedburner.
Since Feedburner has been acquired by Google it has made some features like Feed Stats and Feed Branding free. More of that later. With Feedburner you can even display how many people are reading your blog feeds.


In the Third Step you have to enable Smartcast. For this login to your Feedburner Account and click on your blog name. Click the Optimize tab at the top and then the Smartcast option in the sidebar. See picture below :
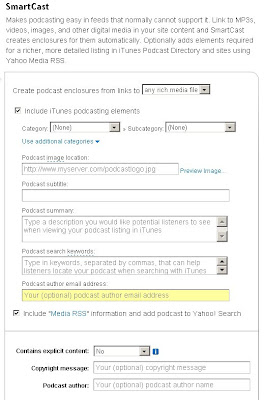

In this select what type of files you have and what category do they fit in. Type a description you would like potential listeners to see when viewing your podcast listing in iTunes. Also enter keywords for your podcast so that it can be searched from iTunes. Lastly activate Smartcast and save your settings. You do not have to copy and paste any code.


In the Final step insert your media file in your blog post's link field and then add your feed url obtained from Feedburner (in the second step above) into your podcast aggregator like iTunes. To put your file in the post paste the link obtained in the first step in the link field below the title field. Publish the post.

Get the widget

Are you curious to know what your readers think about your content? Do you want to enhance their experience on your site? By adding the outbrain ratings and recommendations widget you will get immediate feedback from your readers and provide them with personalized links to more great content.

The outbrain widget is free and is very simple to add to your Blogger, TypePad, WordPress (hosted) or Drupal blog. After adding the widget, we will automatically insert a beautiful 5-star ratings and recommendations widget to the bottom of every post you publish:

outbrain ratings

The outbrain widget is available in 5 popular flavors. Select your blog platform, and/or add to your RSS feed:

We also offer a FeedFlare for adding ratings to your FeedBurner RSS feed:

If you like our stuff and feel like writing about it, here are some screenshots and texts you can grab for your blog!

SEO tip - increase traffic - display post title before blog title in search engines result


When Blogger blogs are listed in the SERP (search engine result page), the default is the blog title is displayed first followed by the post title. See screen shot below:

blog title post title in search engine result page
This is bad especially if the blog title is long, the post title may be truncated. It is better to have the post title first before the blog title like the screen shot below:

search engine result page post title before blog title

In the above case, the post title is displayed first and the blog title is nowhere to be seen. Having the post title displayed first will result in better click through rate from search engines.

Note that had the blog title been as long as the post title you see in the above, the post title would have been obscured, not visible. Even if the blog title did not obscure completely the post title but is before the post title, this will result at less hits (traffic) from search engines. It is also bad for SEO (search engine optimization). It is thus advantageous to have the post title displayed first followed by the blog title.

I tested a hack I found at Optimize Blog Title for Search engine Results and increase visitors on this blog yesterday, Friday 6 February, 2009. I recorded the test at Testing SEO tip - post title and blog title in search engine result page. It will take some time before the change is indexed by the search engines.

And today, one day later, I found the very first search engine result which have the post title displayed before the blog title. Google for countdown for blog and see for yourself or refer to the screen shot below:

search engine result page post title before blog title

Note that the result is displayed as Countdown clock for blog: Blogger Tips and Tricks with the post title displayed first followed by the blog title.

Footnote: I discovered the above by examining the "Recent Pageload Activity" in Statcounter visitor counter statistics. This is one of the thing you can gain from installing a visitor counter. Note that not all the results will have this feature. Some not re-indexed by search engines will not have this feature and it will take time before the rest will display the same. How long I do not know but will continue to check the statistics in my visitor counter

Extra Add a gadget (page element)

The standard 2 column Blogger template have only 3 ADD A GADGET (page element) as shown in the screen shot below:

standard Blogger layout

It is useful to have extra ADD A GADGETs in the blog Header, below the blog Header and in the main column as shown in the screen shot below:

Blogger layout with extra add a gadget

Examples what I use them for is the Google custom search at the top of the main column and the AdSense link units below this blog title. A blogger also wanted to add a Marquee like the one above the blog title in the demo blog. This can be done by adding extra ADD A GADGET. To do this, go to LAYOUT, click EDIT HTML. This will take you to the template editor. Look for showaddelement. Change showaddelement='no' to showaddelement='yes'. If there is a a maxwidgets='1' in front of the showaddelement. Change it to maxwidgets='2' or more or even leave it as maxwidgets='' (unlimited number). If you have problem looking for the above, press ctrl+F and search.

The above (searchbox, ad unit, marquee) were added using a HTML/Javascript gadget. Whatever you add can be dragged to any sections of your blog using your mouse.

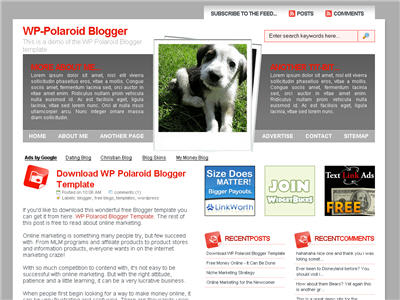
WP-Polaroid Blogger Template


I’m very pleased to announce the release of WP-Polaroid for Blogger! This template is full of cool features and took me a long time to convert from the original WordPress theme (by Adii) so I hope you appreciate it. :-)

This template is very popular with WordPress users and for good reason. It’s stylish, nicely laid out, and very web 2.0. Not only that, it’s also got the following sidebar page elements built in. You just need to configure them (follow the directions below) in order for them to work properly.

  • Flickr photo slideshow area where you can display your personal or random pictures
  • Mybloglog recent blog readers section (you’ll need a mybloglog account)
  • Three 125×125 ad spots to help you make money from your blog
  • Recent posts list
  • Recent comments list
  • Two sidebar link lists
  • Page navigation links in the header
  • RSS feeds for your posts and comments
  • A header spot to display your personal photo

Make sure to read through all the steps below in order for the template to function on your blog properly. I tried to make it as simple for you as possible by using the Page Elements instead of embedded code but if you have any questions, please post them below. I usually get back to everyone within 24 hours so please be patient!

Also, please be aware that in order to correctly setup this template you’ll need to be comfortable with editing the template code as well as some experience with photo editing software (see step #9). I’d hate for you to spend a bunch of time trying to get this template working only to hit a road block towards the end.

WP-Polaroid Blogger Installation

Now I’m going to be honest with you before we begin. When you use this template you’ll most likely have to wipe out all your existing page elements and start from scratch. Not only is this easiest but it also gives you a clean slate. Now this isn’t always the case but I just wanted to warn you upfront. You might even want to setup a new blog within Blogger to test this template out before you really start using it. It’s easy to do — just go to your Blogger dashboard (top right corner link) and “create new blog”. Think of it as a testing area before clobbering your existing blog. Another option is to try and backup your existing page elements which is explained in my “How to Install a Blogger XML Template” article.

Disclaimer: I am not responsible if you mess up your Blogger site. This template and set of instructions is free but does not come with any sort of warranty. I’m sure you already realize this but I just wanted to cover my butt regardless. (this is the fine print)

The following 10 steps assume you’ve installed the new WP-Polaroid Blogger template and are now ready to configure the page elements. If you had trouble installing the template, try applying it a second time and saving. Blogger is buggy and that’s actually what I had to do when setting up a demo blog for this writeup (Update - you might want to start with step #10 and then come back to step #1 since it involves editing the actual template code before setting up the page elements).

You can also download the original Photoshop .psd from Adii’s site if you’d like to modify the images. He also provides some steps on setting up the template but for WordPress only.

Open your blog site in a new browser window so you can see how it currently looks. I’ve put some placeholder text in some areas (which we’ll replace in the steps below) to give you an idea as to how it’s supposed to look. Now in a separate browser window, head on over to “Template” =>”Page Elements” and we’ll start setting up your new Blogger template.


DOWNLOAD