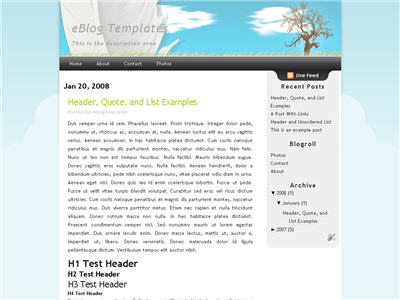
iTheme Template


This beautiful Apple OS knock off new Blogger template is awesome. Not only does it look and feel just like you’re using a Mac, but it’s quite functional as well. It includes the original really cool drag & drop sidebar feature which allows you to rearrange the order of your sidebar in a dynamic fun way (check out the demo and try it yourself). It also includes the FeedIt widget which shows real-time live traffic to your site.

This template also comes with a top AdSense link unit which is a great spot to make money with your blog. Make sure you have a Google AdSense account and then you’ll need to modify the template code and replace the AdSense code with your own.

So if you’ve got the iPhone, iTouch, iPod, iMac, and all the other amazing Apple products, this template has your name all over it. Now you can have your own iBlog template!

I love the silver and white modules with the icons and the tabs. Speaking of tabs, if you want to add some you’ll need to edit the “top tabs” page element within Blogger. It’s easy to do though since it’s a link list. That means you don’t need to go muck around in the template code to add/remove new tabs. A cool feature added by eBlog Templates.

The date box on each post is a bonus feature as well. If the date doesn’t show up when you first install it, you’ll have to make a small change in your Blogger settings. Go to “Settings” => “Formatting” => “Timestamp Format” and change it to this format: Saturday, February 09, 2008. That should make the date feature work.


DOWNLOAD
Dreamy Template


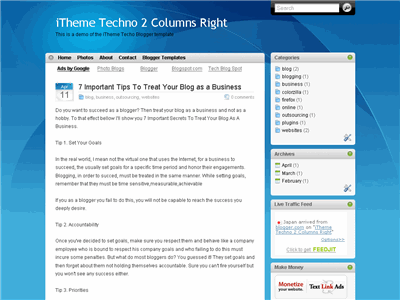
Dreamy is a pleasant and relaxing new xml Blogger template with it’s header consisting of a large white feather, blue sky, clouds, and a tree. It’s color scheme is neutral and easy on the eyes while the functionality is nicely done.

It comes with cool tabs that get underlined by an icon when you move your mouse over them. The tabs are also controlled by a link list widget so there’s no need to fudge with the template code. It also comes with a nice rss feed image which changes when you mouse over it as well. The rss feed is wired up so no configuration for you to worry about.

Further down the sidebar, you’ll find a recent posts widget which is very nice to have. It’s a modified version of an rss feed widget so just plug in your rss feed and it will start working.

All images are hosted with our primary service provider (Photobucket) using their Pro account. This means your blog images will work unlike several other sites out there who distribute broken blogger templates. We recommend you move the images to your own server (if you’ve got one) so you have complete control and can add/remove as you please.


DOWNLOAD

Ads Theme Template

Click to enlarge Ads Theme Blogger template

If you’re looking for a new Blogger template, you came at the right time. Hands down, this is the best template we’ve converted here at eBlog Templates. It’s a wonderful web 2.0 popular blog layout with some great built in ad spots (hence the template name) and features.

It’s either a two or 3 column template (you can change it on the fly) so you get the best of both worlds. This Blogger template is what I call a “powerhouse” template since almost all the features you need are already built in. On top of that, it’s quite easy to setup and makes your blog look like a professional site without much effort.

I predict this template will be a top template on this site within a few months, if not weeks. With the amount of effort that went into converting this template and attention to details, I sure hope you appreciate this free amazing new xml Blogger/Blogspot template.

Features Include

  • Two or Three right side columns which are easy to switch (default is three)
  • Three great location ad spots (header banner 468 x 60, three 125 x 125 buttons in sidebar, and a 468 x 60 AdSense banner above the first post)
  • Integrated Feedburner rss and subscribe via email sidebar module (also includes “add to favorites” Technorati link)
  • Built-in live traffic feed widget from FEEDJIT
  • Built-in MyBlogLog and BlogCatalog recent reader widgets
  • Dynamic tabs easily created by editing the link list widget
  • Search box without the need for a “go” button
  • Recent posts and comments widgets
  • Nicely designed individual blog post comments section
  • Properly setup Blogger layout editor

DOWNLOAD

PassionDuo Green Template


Here is the third and final version of our latest make money blogger template first converted here at eBlog Templates.

This template includes several popular ad formats for your blog. You get a 468 x 60 banner spot in the header, six 125 x 125 banner spots in the right sidebar, and plenty of other sidebar spots for skyscraper banners.

We’ve also included our popular sidebar widgets such as Recent Posts, Recent Comments, and the cool Feedjit (real time visitor widget). Just paste in your blog rss feed urls into the Recent Posts & Comments widgets and they’ll start working.

Unlike most other custom make money blogger templates, we’ve taken the extra step and setup the “Fonts & Colors” functionality. That means you can change all the colors and font styles easily by just using the built in Blogger section. We’ve also customized the comments section so it looks very professional as well.

PassionDuo also includes top tabs which can be added via your Blogger page element screen. The rss feed icon will automatically appear once you add your first tab so don’t be alarmed after you first install it.

Configuring the rest of this template is actually quite easy. You can swap out the ads and replace them with your own or feel free to keep the existing ones if you don’t have any to use. Make sure you check the “Expand Widget Templates” checkbox on the “Edit HTML” page within Blogger before trying to make any edits. Also make sure to backup your old template just in case you make a mistake.

Let’s start with the 468 x 60 header banner. Search for “” in the template code and the first one you come across is where you replace the ad.

The second instance of “” is for the Google AdSense code which you can either keep, replace, or just remove completely.

For the six 125 x 125 banner ads you’ll need to find “” and update those one by one. Make sure not to delete the

  • and
  • before and after each ad otherwise it will look funny. If you don’t already have ads to use, I recommend clicking through each banner and become an affiliate. Then you can replace the affiliate codes with your own and start making money!

    DOWNLOAD

    Cara Membuat Widget Kategori Label

    Widget kategori label memang berperan cukup penting untuk sebuah blog, selain membuat situs kamu menjadi lebih menarik, dan terlihat professional. Category Labels ini juga memudahkan pengunjung untuk mengklasifikasi artikel kita. Menurut hemat saya ada tiga model untuk membuat widget ini yaitu: tag clouds, comulus clouds, labels (standar blogger). Saya sendiri lebih suka menggunakan label category standar blogger, karena Tag cloud dan comulus cloud menggunakan javascript dan flash yang agak membuat loading page blog kamu jadi berat, selain itu juga cara ini sangat mudah dan tidak ribet (gak perlu menghack dengan kode-kode yang memusingkan, karena layananan ini sudah terintegrate di blogger sendiri). Secara fungsi tetap sama menampilkan informasi kategori artikel kamu, hanya beda tampilan saja. Ok, kali ini saya akan menjelaskan bagaimana cara membuat widget kategori label menggunakan feature dari blogger, lanjut?

    Untuk membuatnya mari kita ikuti langkah-langkah berikut:
    1. Login ke account blogger kamu
    2. Pilih layout > add gadget pada sidebar kamu untuk membuat elemen halaman baru
    3. Pilih Label, perhatikan gambar di bawah ini:


    4. Pada Title kamu isikan judul widget kamu, misal: kategori, daftar ini, labels, dsb. Pada pilihan sorting kamu bisa memilih Alphabetically untuk mengatur labels kamu secara abjad dan By Frequency untuk mengatur labels kamu dari jumlah artikel terbanyak. Tampilan Previewnya akan terlihat.

    5. Jangan lupa Save dan lihat hasilnya.

    Wah?? isi Category Labes Widgetnya masih kosong mas?? Gimana ya? Ya iyalah... secara duren aja di belah bukan di bedong wakakakak...!!! Kamu perlu mengedit kembali semua arikel yang sudah kamu posting dan isikan label kamu sesuai dengan artikel kamu, caranya kamu tinggal masuk ke menu posting > edit posts lalu edit satu persatu artikel yang kamu buat dan masukkan isi kategori (misal: belajar blog, SEO, bisnis internet dsb) kamu pada Labels for this post: kotak di bawah kanan dan publish. Kamu bisa mengisi lebih dari satu kategori dengan memisahkan menggunakan tanda koma ",". Untuk lebih jelasnya lihat gambar berikut:


    Jangan lupa setiap kamu artikel yang akan kamu posting di buat label kategorinya juga, untuk contoh kategori labels ada di blog ini pada sidebar (kategori), selamat mencoba...!!!